Monday, June 22, 2015

Revlon Ultra HD Lipstick - Rose 830 - A Review

I'm going through a lipstick phase, clearly as I've done a fair few posts since the new year, but I think I've been good in that the shades which I'm picking up have been fairly varied. Today, in the interests of giving some more budget friendly high street options a try I'm reviewing one of the newest launches from Revlon.
I'm talking of course about the Revlon Ultra HD Lipsticks which you can pick up for around £7.99. They come in a variety shades with 14 strong shade selection going from vivacious reds and vivid pinks, to more muted nudes such as the shade above. 
As I was in the market for a 'my lips but better' shade I opted to go for the shade Rose, which is a gorgeous nudish pink shade, and, as it turns out, exactly what I was looking for.
Formula wise, these are all wax free and instead use gel technology to provide a pure hit of colour in just one swipe. It's this gel technology which means the lipstick itself applies like an absolute dream, almost like applying a lip balm. This is because the gel texture ensures there's no dragging and also means the colour application is much more even than with a traditional wax based lipstick. The swatch above was with just one swipe of the bullet and you can see there is some serious pigment being deposited.
They do have quite a strong scent vanilla to them, so, if you can get past that, then you're in for a treat. This lipstick delivers a good pop of buildable colour which is smooth, weightless and surprisingly, non-drying.
The above photo shows the lipstick in two different lights. You can see the pigment is pretty intense despite being a nude shade.

All in all, these were great value, longevity wise, I would say a couple of hours before reapplication was required, but for £7.99 (these were actually two for £10 so a bargain) I won't be complaining any time soon.

Have you tried the new Revlon Ultra HD Lipsticks? What are you favourite shades?

Monday, June 15, 2015

Bobbi Brown Long-Wear Cream Shadow Sticks - A Review

Even with primer, my lids tend to be quite oily which means that unless I'm using primer, eye shadow tends to sit in the creases and/or virtually disappear by the end of the day. As such, I'm always on the look out for eye shadow which is long lasting and can hold it's own against my make-up munching face!
As we're off on holiday soon, I thought it would be a great time to pop my Bobbi Brown cherry and try something new which I could test while at home and while we're away in warmer climes!
I grabbed two shades from their Long-Wear Cream Shadow Stick collection which are new for this season. Namely, Dusty Mauve 23 and Goldstone 24.
What drew me to the Long-Wear Cream Shadow Sticks was that they claim to last for up to 8 hours without creasing, flaking or fading. They also claim to be waterproof which is ideal if you're off somewhere toasty and things get a little heated.
Being in stick form, obviously they're super easy to travel with and can be applied straight from the stick or smudged out with your fingers or a brush if you get in there quickly enough. Simply twist and go.
The shade Dusty Mauve which is on the right is advertised as being a shimmering lavender shade, while Goldstone on the left is a shimmering brown gold. I prefer shimmering shades to matt shades as I'm sure you've gathered but the Long-Wear Cream Shadow Stick collection comes in both matt and shimmer shades if you're interested.
In the centre I've swatched both colours at intensity and then on the outside, I've blended them out to give you a clearer idea of how they can look if you're after a softer effect. This photo was taken in natural light and you can see that the Goldstone colour almost has a hint of khaki about it whilst the Dusty Mauve looks rather bronzy in tone.
I took this photo right by my window and you can see that in this light, the lavender notes are quite visible in the Dusty Mauve giving my hand almost a wet style look. The Goldstone really does sheer out quite well making it ideal for layering up over other colours if you fancied.
I've got both colours layered up in the photo above with Dusty Mauve on the bottom and Goldstone sheered out over the top to bring a pop of, well gold to the eyes.

At £20 a pop these certainly aren't cheap, but they were long lasting which is exactly what I was after. I've tried products from the high street which claim to have 24-hour wear, but they just didn't deliver. These however, did! I've applied them both first thing in the morning (around 6:30 am if you're interested) and checked both at lunch and after work (5:30 pm) and found that they had only just started fading at the after work portion of my day, well after the 8 hours they claimed to last.

That makes them worth every penny in my book and I can't wait to add more shades to my collection.

Have you tried the Bobbi Brown Long-Wear Cream Shadow Sticks? What are your favourite shades? If you spot Golden Pink anywhere please let me know, I'm desperate to get my mitts on it!

Saturday, June 13, 2015

Outfit of the Day - Getting Crazy

Today (i.e the day I'm writing my post) was one of those days. Whilst deciding what to wear, I obviously looked outside and noted the glorious sunshine and beautiful blue skies. As such, I thought it would be great opportunity to restyle my lovely blue Oasis midi-skirt.
I got dressed, obviously, made sure my hair looked lovely and opted to wear a pair of sandals. Naturally, this meant that the second we hoped on the bus, it started pouring with rain leading to my hair becoming a flat and scruffy mess. Onwards and upwards though, sometimes we have to make the most of what we have!
Once the rain cleared, we ventured back outside and quickly snapped a few shots of my outfit before another band of rain moved in. I refused to believe I got all dressed up for nothing, and so, without further waffling I can confirm I'm wearing:

Shirt: Boyfriend fit from Next
Skirt: Midi-skirt from Oasis
Shoes: Clarks
This week I took my style inspiration from Jessica Alba who I'd seen in the most beautiful midi-skirt with a loose fitting shirt and heels. Obviously Ms Alba looked considerably more polished than I do, but I think that despite my very flat hair, the look works and you can see what I was going for.
I love the fit of this shirt, it very loose despite being a size down from what I'd normally go for. For me this is a good thing, especially in humid weather as I hate wearing anything that's overly fitted and clingy. It just makes me feel restricted. 
As it's a boyfriend style fit, the sleeves are pretty long, making them awesome for rolling up, and the actual length of the shirt is pretty long to boot. The longer length makes it an ideal piece for tucking into skirts or trousers and also means it provides a good balance when paired with more figure hugging pieces such as skinny fit jeans.
 
I kept things looking feminine with my Oasis midi-skirt and it's oriental china blue print. You might remember this skirt from a post I featured during winter last year where I donned it with knee high boots and a chunky knit jumper. I think the tan sandals also add a more girly and feminine feel to things.
Just to prove I wasn't too sore about the rain ruining my hair, I decided to get a little bit silly and dance around. Just because....of reasons. I'd hate you guys to think that I couldn't laugh at myself!
Besides, sometimes it's the silly photos which prove that us bloggers are still human underneath it all and that what you see online is just a snippet of what we're really like. In the interests of showing you my crazy side, I hope these photos will make you smile.
Sometimes life isn't perfect but you just have to roll with it and show it you're not scared!

Are you still loving midi-skirts as much as me? How would you style a boyfriend shirt? Would you let the rain ruin a perfect good outfit shoot?


Monday, June 8, 2015

"You're As Good As Your Tools" Is Beauty Tech Really Worth The Investment? No.2

As I'm sure you can gather, today's beauty post is tech related and the second post in this series has been a seriously long time coming.
Today, I'm sharing with you the new Babyliss Pro Perfect Curl with Hydrotherm Technology which is currently available from QVC UK via the link above or from Babyliss directly. In short, this device curls your hair whilst conditioning and adding shine thus giving you salon perfect locks.
In the box you get the curling device itself, a spare water container, a cleaning device and an instruction manual (of course.)
I used this pretty much straight from the box and can honestly say, it was incredibly easy to use and took me about 10 minutes to do my hair without any previous experience of using such a gadget. To start with, please do ensure that your hair is brushed through as it'll be easier to grab sections to insert into the perfect curl.
The switch at the bottom turns it on and allows you to select one of three heat settings, Setting 1 (190 degrees) for fine hair, Setting 2 (210 degrees) for normal hair and Setting 3 (230 degrees) for thick hair. I used Setting 2 on my hair and found this was the perfect temperature for me.
To use, it's simply a case of switching it on, waiting for it to heat up (which took about 30 seconds), inserting a section of hair and waiting for the beeps to tell you that your hair is done. The second switch controls how long your hair will remain in the chamber for a therefore how tight your curls will be. The options are 8, 10 and 12 seconds for either loose & natural curls, soft & bouncy curls or tight & defined curls. I went for 8 seconds as I wanted something very loose and laidback.
If you add too much hair as I tried to above, the perfect curl will beep at you to let you know. You can then release your hair and try again with a smaller section. My hair did not get tangled or knotted at all.
If you've added the right amount of hair, the hair at the bottom of the perfect curl will disappear while it does its thing.
If you add some water in the little grey chamber you can see in the bottom left of the picture, you'll get a shot of steam to condition your hair.
Once you've heard the required amount of beeps, it's just a case of releasing the perfect curl and releasing your picture perfect waves. The top switch controls which direction the waves will go in, and again, there are three options, these being left, right or automatic which will alternate the waves for you making them look gorgeous and natural.
Just repeat the steps above all over your head to allow your curls to cool and then get your fingers in there to loosen things up. If you use a brush or a comb to loosen your waves things could get a little fluffy. Using your fingers and adding a little hairspray will give you that fresh from the salon look.
Overall, I absolutely loved the Babyliss Pro Perfect Curl, it took the guess work out of curling my hair and gave me perfect curls each and every time. Usually I can only get one side of my head looking half decent, but this time, my hair looked wonderful even right at the back where I can't even see! 

The other things I noticed were that my curls really lasted, 3 hours later and the curls were still going strong even though I hadn't used hairspray! Usually they drop significantly as I have such fine hair. The following morning, whilst the curls were very loose, they were still very much there and with a spritz of dry shampoo and a touch of product I was ready to hit the high street.

It's worth every single penny and I'd highly recommend it.

Have you tried the Babyliss Pro Perfect Curl? Have you tried anything similar? What do you think? Would you be tempted to try it after seeing my post?

Saturday, June 6, 2015

Outfit of the Day - Black & Gold

This weeks outfit post is something a little different given that it was our 7 year anniversary. As such, I wanted to take full advantage of the opportunity to get seriously dolled up!
That means a little black dress, a pair of heels, big hair and a red lip courtesy of Chanel. Today I'm wearing:

Dress: New Look
Heels: Clarks
Hand Bag: Mary Portas
I actually grabbed this dress from New Look over the festive period and have to admit when I first spotted it, I wasn't overly sure. Why?
Well first of all it's incredibly fitted and so requires some seriously decent fitting underwear to keep things smooth and flattering. The second issue was its midi length which can leave us shorter ladies looking a little on the stumpy side if not styled correctly!
At a penny pinching £20 though, I thought it was worth a shot and a great opportunity to try something new and totally outside of my comfort zone. I think it was worth the chance, it fits like an absolute dream, the black panelling creates the illusion of a smaller waist and the sheer panel at the top makes things fun.
Make up wise, I wanted to keep things fresh with a gorgeous pop of colour. As a base I'm wearing the bareMinerals Complexion Rescue which I mentioned in my Monday post with a light dusting of Les Beiges on the top. On the eyes, I've smoked up some of the new Bobbi Brown longwear shadows and on the lips it's Chanel Rouge Coco in Arthur which I posted about a fair old while ago.
My hair comes courtesy of my newest toy, Babyliss Pro Perfect Curl which is an absolute dream to use. I'll be doing a post on this in the next couple of weeks as I've been so incredibly impressed with not only the ease with which I can curl my hair, but the fact that even the following morning, the curls were still in tact! AWESOME.
Overall I really loved this look, it was simple and playful and made me feel like $1,000,000 (Cue Mr Evil style facial posing!)

How would you style this dress? What are your tips for keeping your bodycon dress looking its best? Any tips and tricks on the underwear front?


Monday, June 1, 2015

bareMinerals Complexion Rescue - A Review

If you read my blog fairly regularly, you'll know that where possible, I try to avoid using products with one too many chemicals in them. Whilst there are mixed reports out there about various bits and pieces, from experience, I know that they just don't agree with my skin.

How is this relevant to today's post? 

Well, bareMinerals are one of those brands who products focus on skin-loving minerals which are actually good for you. Each time you use one of their make-up products, you're actually reaping all sorts of skin loving benefits at the same time and this particular product is another weapon in both my skincare and make-up arsenal.
Today, I'm talking about the bareMinerals Complexion Rescue Tinted Hydrating Gel Cream, to give it it's full name. At £26, this is a product which not only delivers some wonderful skincare benefits but it's also a pretty clever piece of make-up as well. It claims it can replenish thirsty skin, energize the skin and also protect against environmental stresses so if it can deliver, I reckon it's a bargain.
As it's available in around 10 shades, my first step was to nip into John Lewis to get colour matched. Whilst I suspected I would be the lightest shade, Opal, it's always handy to have a professional let you know the score. (Funny Story, John Lewis didn't have my shade in stock so I had to nip into Boots who colour matched me at Vanilla which is slightly darker....I knew in my heart of hearts this was wrong so I took a sample home to try. Sure enough, it was very noticeable on my skin so Opal it was). You can tell which colour I came home with.
Moving on, what really appealed in the first instance was that you can apply this with either your finger tips or a brush. The former means it's super quick and easy to apply without faffing, the latter means if you want to really work it into your skin and you have the time, you can do so. I've tried both methods of application and love them both in equal measure.

The next thing which appealed was that not only does this contain SPF 30 making it great for the summer, but that it combines all the benefits of a BB cream, CC cream and a tinted moisturiser in one simple product. If you're looking for make-up which will give you a gorgeously natural, no make-up make-up look then I reckon you'll love this as it leaves you with a beautifully healthy glow.
The formula is gorgeously lightweight, surprisingly hydrating (Bare Minerals claims it can increase skin hydration by 215% in a week!) and a piece of cake to apply. I tend to use this over my usual moisturiser and a primer, not because it's not moisturising but because I prefer to treat this like I would any normal piece of make-up.
In the above photo, I've blended the swatch out to cover my hand. As you can see, the coverage is medium to sheer as you can still see my skin peeking through, but the redness has been significantly reduced and the complexion tone evened out. Redness is something which I can get quite a bit of, especially around my nose so I tend to go for products which will help even me out without looking overly heavy.
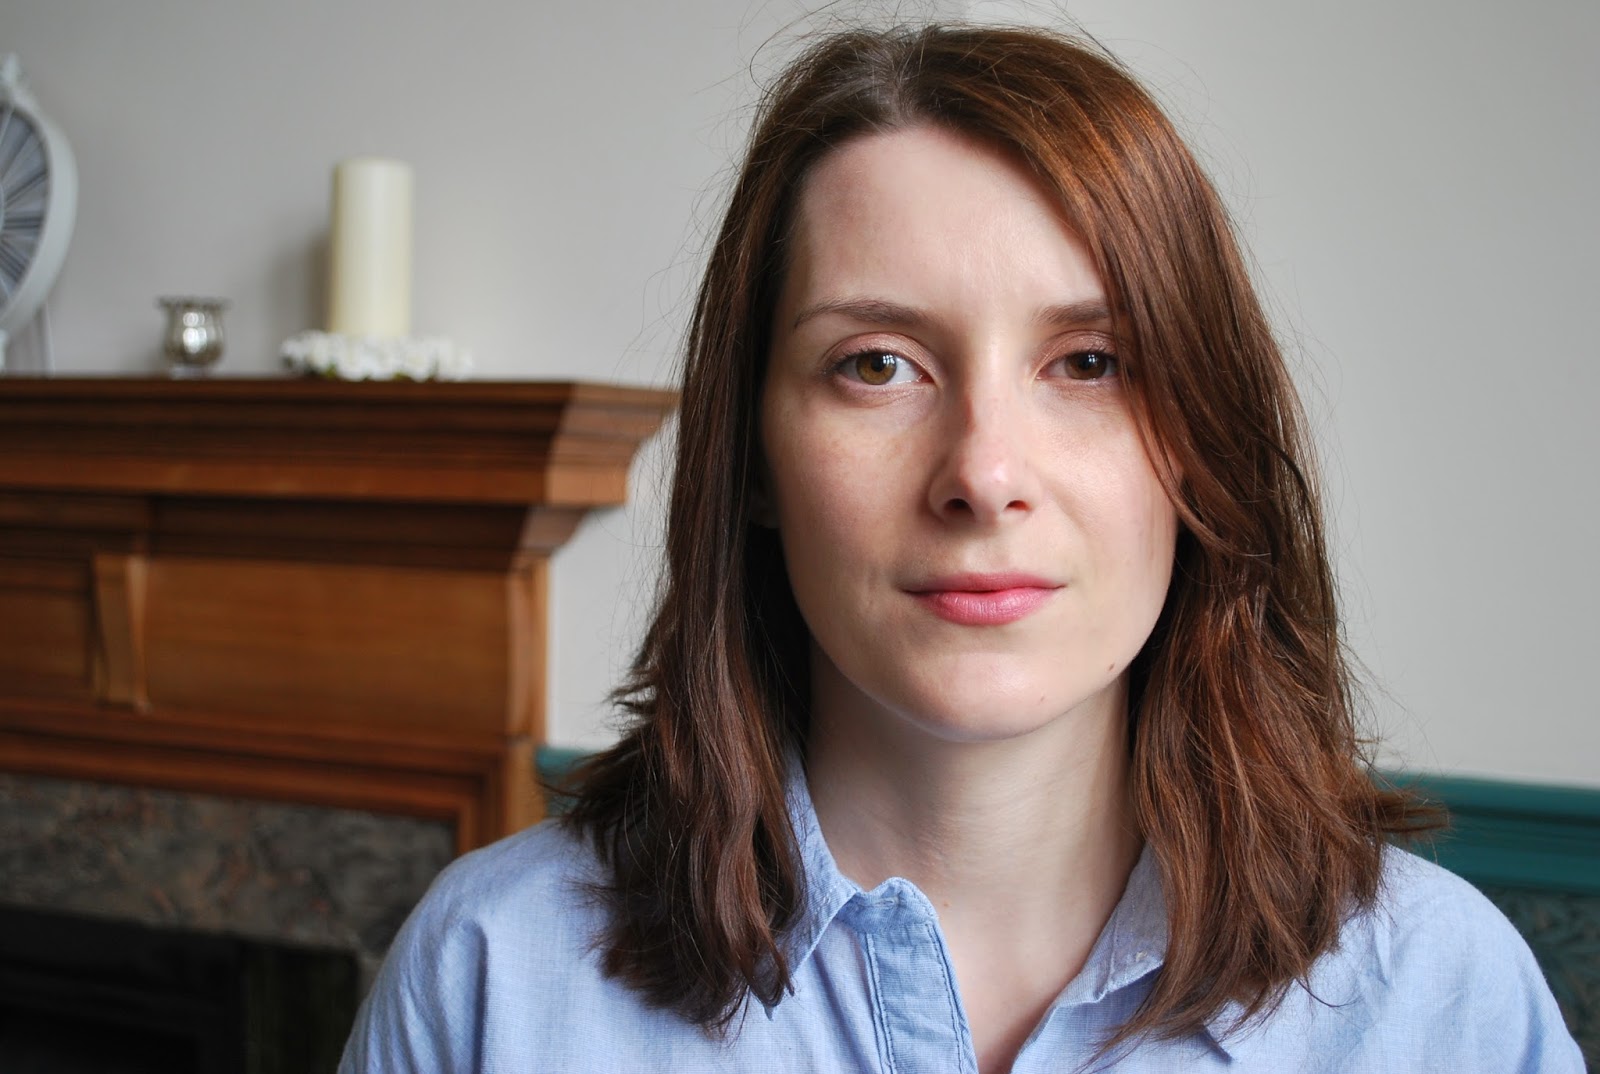
Here's a photo of me wearing the Complexion Rescue. I've loved it so much, I've been wearing it almost every day since my birthday over two weeks ago. It's just so easy to apply and requires minimal effort which is what I want at 6:20 am, who has time for blending at that time of the morning!?

By using it as I would my normal make-up, I do find this to be really long-lasting. It doesn't settle into my pores and my skin still looks lovely by the end of the working day. Finish wise, I'd say this is more dewy, probably owing to the fact that water is the main ingredient. As such, if you prefer a more matt look, then unless you want to apply powder over the top, this won't be for you.

All in all, this is an awesome product which I intend to use all through the summer.

Have you tried bareMinerals Complexion Rescue yet? What did you think? Are you a tinted moisturiser kinda girl or do you prefer fuller coverage?
 
Design by Studio Mommy (© Copyright 2015)